Saturday, October 15, 2011

Adventures in Gem Cutting

Boris Kolodny, our teacher

Rock quartz - what our gems looked like before we started
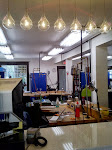
The set-up: my smokey quartz is there in the hand piece.


pre-polish lap - made with 20 carats of diaminds.


Yay! gem cutting!!
I jumped on board for the chance to take the gem cutting class that we have running this weekend at Jewel Envy.  I guess I have a romanticized vision of how cutting a gem stone would be like... selecting my gem from a lump of rock and imagining the precious cut gem within like Michelangelo would envision his sculptures trapped within the marble before he began carving.  Like anything you want to accomplish as a goldsmith it is fraught with nitty gritty details.  To speed up the process our teacher, Boris brought us students our chosen gem with a smooth cut gem that we would be adding facets.  To accomplish this we would be using a specialized hand tool that has precise degrees like a compass to tilt the stone at a certain angle and to rotate the gem by exact increments.  Using different grit "laps" we carefully grind each facet onto the surface.  All this is easier than described since there is such a tiny margin for error.  If you make one facet a bit too large than it will effect the entire cut of the piece (which is what I ended up doing and with the help of Boris correcting).  It also took me quite a while to get a good polish on my bottom facets, but after today I have completed 32 facets, woohoo!  I decided to leave the girdle of my gem unpolished.  As Boris let me know, the industry standard was to leave it unpolished only until about ten years ago.  I will post more pics and the final gem when I finish it tomorrow.

-Alexis 

No comments:

Post a Comment